> ## Documentation Index
> Fetch the complete documentation index at: https://docs.prigeex.com/llms.txt
> Use this file to discover all available pages before exploring further.
# Swap Tokens
Swapping is trading one token for another, for example, USDC for ETH. On PrigeeX this happens directly from your wallet, in a few seconds, with no middleman.
## Before you start
* Your wallet is [connected](../getting-started/connect-to-prigeex) and on **Arbitrum One**
* You have the token you want to trade **from**
* You have a little **ETH** for the network fee
## How to swap
1. Go to the **Swap** page.
2. In the **From** field, pick the token you're paying with and type an amount.
3. In the **To** field, pick the token you want to receive. PrigeeX instantly shows you the estimated amount you'll get.
4. Review the details (price impact, fee, slippage: explained below).
5. If it's your first time trading a particular token, you may need to **Approve** it first (a one-time permission). Confirm this in your wallet.
6. Click **Swap**, then **confirm** the transaction in your wallet.
7. Wait a few seconds. You'll see the status update to **Confirmed**, with a link to view it on Arbiscan.
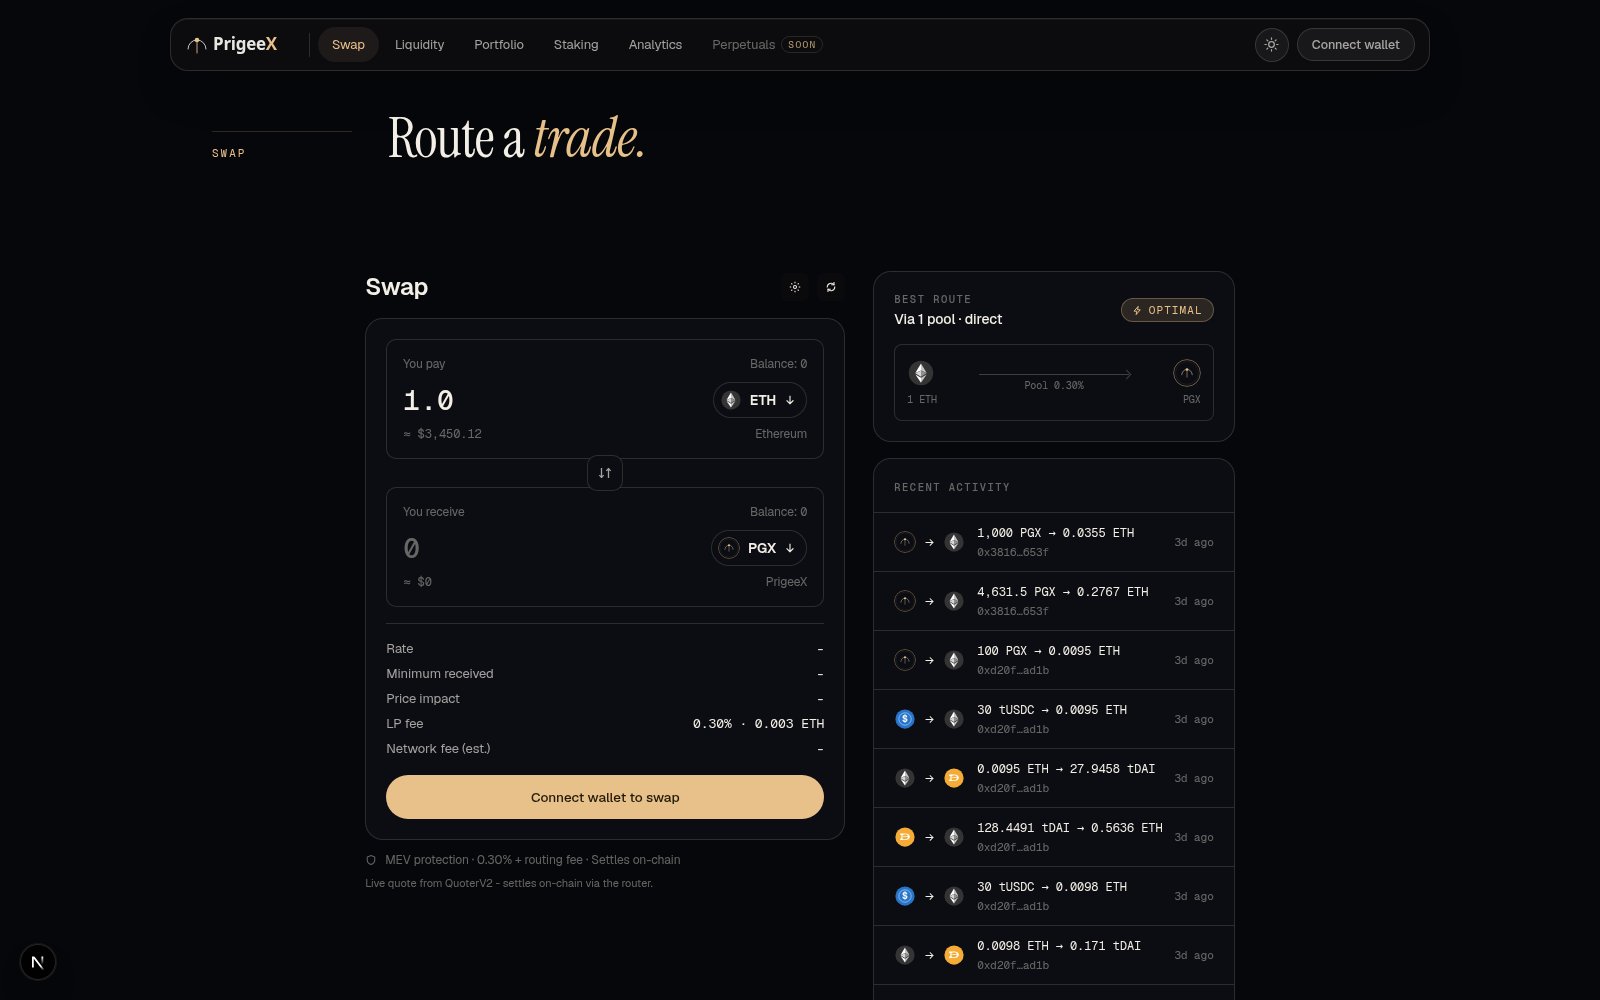 **Reverse in one click.** Use the small ⬍ arrow between the two fields to flip the direction of the trade instantly.
## Understanding what you see
### Price quote
As you type, PrigeeX shows a live estimate of what you'll receive, updated in real time. PrigeeX automatically finds you a good price across all of its available pools (both Classic and Concentrated), so you don't have to think about where the trade routes.
### Price impact (the color-coded number)
Large trades can move the market price a little. PrigeeX color-codes this **price impact** so you can see it at a glance:
* ⚪ **White** (under 1%): minimal impact, good to go
* 🟡 **Golden** (over 1%): noticeable; consider a smaller size
If you see golden, the trade may be large relative to the pool. Splitting it into smaller swaps can help.
### Slippage tolerance
Prices can shift slightly between the moment you click and the moment the trade settles. **Slippage tolerance** is the maximum change you'll accept before the trade cancels itself to protect you. The default is **0.5%**, which suits most trades. You can adjust it in settings; higher tolerance means the trade is more likely to go through but at a potentially worse price.
### Network fee (gas)
The small ETH fee to process the trade. PrigeeX shows an estimate before you confirm. On Arbitrum this is typically just a few cents.
### Transaction deadline
If a trade hasn't settled within a set time (default **20 minutes**), it cancels automatically so you're not stuck with a stale price. You can change this in settings.
## After the swap
The status shows **Pending → Confirmed** (or **Failed**). Once confirmed, your new tokens are in your wallet immediately. Click the **Arbiscan** link to see the trade on the public blockchain explorer.
## If something goes wrong
* **The Swap button is greyed out**: your wallet may not be connected, your balance may be too low, or no trading route was found for that pair. Check each.
* **The trade failed**: often this is slippage: the price moved more than your tolerance allowed. Try again, or raise your slippage slightly. See [Fees & Gas](../learn/fees-and-gas) for more on why swaps fail.
## Related
* [Fees & Gas](../learn/fees-and-gas)
* [Glossary](../reference/glossary)
* [FAQ](../reference/faq)
**Reverse in one click.** Use the small ⬍ arrow between the two fields to flip the direction of the trade instantly.
## Understanding what you see
### Price quote
As you type, PrigeeX shows a live estimate of what you'll receive, updated in real time. PrigeeX automatically finds you a good price across all of its available pools (both Classic and Concentrated), so you don't have to think about where the trade routes.
### Price impact (the color-coded number)
Large trades can move the market price a little. PrigeeX color-codes this **price impact** so you can see it at a glance:
* ⚪ **White** (under 1%): minimal impact, good to go
* 🟡 **Golden** (over 1%): noticeable; consider a smaller size
If you see golden, the trade may be large relative to the pool. Splitting it into smaller swaps can help.
### Slippage tolerance
Prices can shift slightly between the moment you click and the moment the trade settles. **Slippage tolerance** is the maximum change you'll accept before the trade cancels itself to protect you. The default is **0.5%**, which suits most trades. You can adjust it in settings; higher tolerance means the trade is more likely to go through but at a potentially worse price.
### Network fee (gas)
The small ETH fee to process the trade. PrigeeX shows an estimate before you confirm. On Arbitrum this is typically just a few cents.
### Transaction deadline
If a trade hasn't settled within a set time (default **20 minutes**), it cancels automatically so you're not stuck with a stale price. You can change this in settings.
## After the swap
The status shows **Pending → Confirmed** (or **Failed**). Once confirmed, your new tokens are in your wallet immediately. Click the **Arbiscan** link to see the trade on the public blockchain explorer.
## If something goes wrong
* **The Swap button is greyed out**: your wallet may not be connected, your balance may be too low, or no trading route was found for that pair. Check each.
* **The trade failed**: often this is slippage: the price moved more than your tolerance allowed. Try again, or raise your slippage slightly. See [Fees & Gas](../learn/fees-and-gas) for more on why swaps fail.
## Related
* [Fees & Gas](../learn/fees-and-gas)
* [Glossary](../reference/glossary)
* [FAQ](../reference/faq)